A small leak today becomes a $50,000 repair tomorrow. Commercial roofs face constant assault from UV rays, heavy rain, wind, and temperature swings, yet most building owners don’t inspect them until something goes wrong. A thorough commercial roof inspection checklist helps you catch problems early, extend your roof’s lifespan, and avoid emergency repairs that drain your budget.
At Sunflowers Energy LLC, we’ve inspected hundreds of commercial roofs across multiple industries. We’ve seen firsthand how routine inspections prevent costly failures and keep businesses running without disruption. The difference between a roof that lasts 15 years and one that lasts 25 often comes down to consistent, methodical maintenance.
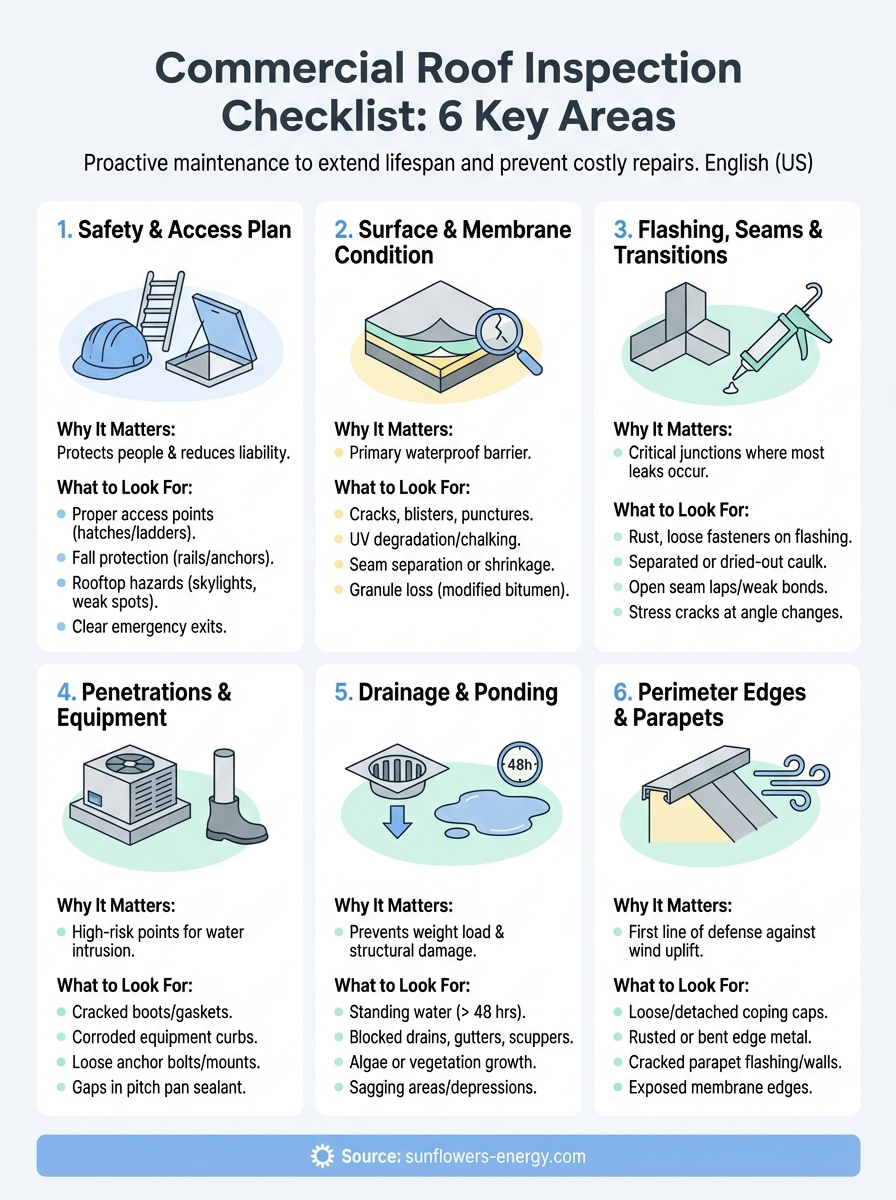
This guide breaks down the six key areas every commercial roof inspection should cover. Whether you’re conducting your own walkthrough or preparing for a professional assessment, you’ll know exactly what to look for, and what to document for insurance or maintenance records.
1. Safety, access, and inspection plan
Before you step onto any commercial roof, you need a solid safety protocol and clear access plan. This first step on your commercial roof inspection checklist determines whether the inspection happens safely and efficiently. Too many property managers skip this planning phase and put themselves or their contractors at risk.
Why this area matters
Safety protocols protect you from falls, equipment hazards, and liability claims. Commercial roofs sit 15 to 100 feet above ground, and the leading cause of construction fatalities involves falls from heights. Your inspection plan also affects insurance coverage and OSHA compliance, especially if you employ maintenance staff or hire contractors.
A documented safety plan reduces your liability exposure and ensures inspectors can access all roof areas without creating additional damage.
What to look for
Check that you have proper access points like interior roof hatches, exterior ladders, or scissor lifts. Identify all rooftop hazards including skylights, weak decking areas, and electrical equipment. Verify that fall protection equipment meets current standards and that weather conditions allow safe inspection.
How to check it
Walk the building perimeter to locate all access routes and emergency exits. Review your building’s roof access logs to confirm the last inspection date and any reported concerns. Contact your insurance provider to verify if they require specific safety certifications or documentation before roof access.
Red flags that need a pro
Call a professional roofing contractor if you lack fall protection training or certified equipment. Hire experts when your roof exceeds three stories, contains hazardous materials like asbestos, or shows visible structural damage from the ground. Properties with complex rooftop equipment arrays also warrant professional inspection due to electrical and mechanical risks.
How to document findings
Create a pre-inspection safety checklist that includes weather conditions, personnel present, and equipment used. Take photographs of all access points and safety measures in place before beginning. Record the inspection date, time, and any areas you couldn’t safely access for future reference.
2. Roof surface and membrane condition
Your roof membrane serves as the primary waterproof barrier protecting your building from water intrusion. This section of your commercial roof inspection checklist focuses on the top layer of your roofing system, where most visible damage appears first. TPO, PVC, EPDM, and modified bitumen membranes each show distinct wear patterns that signal when repairs become necessary.
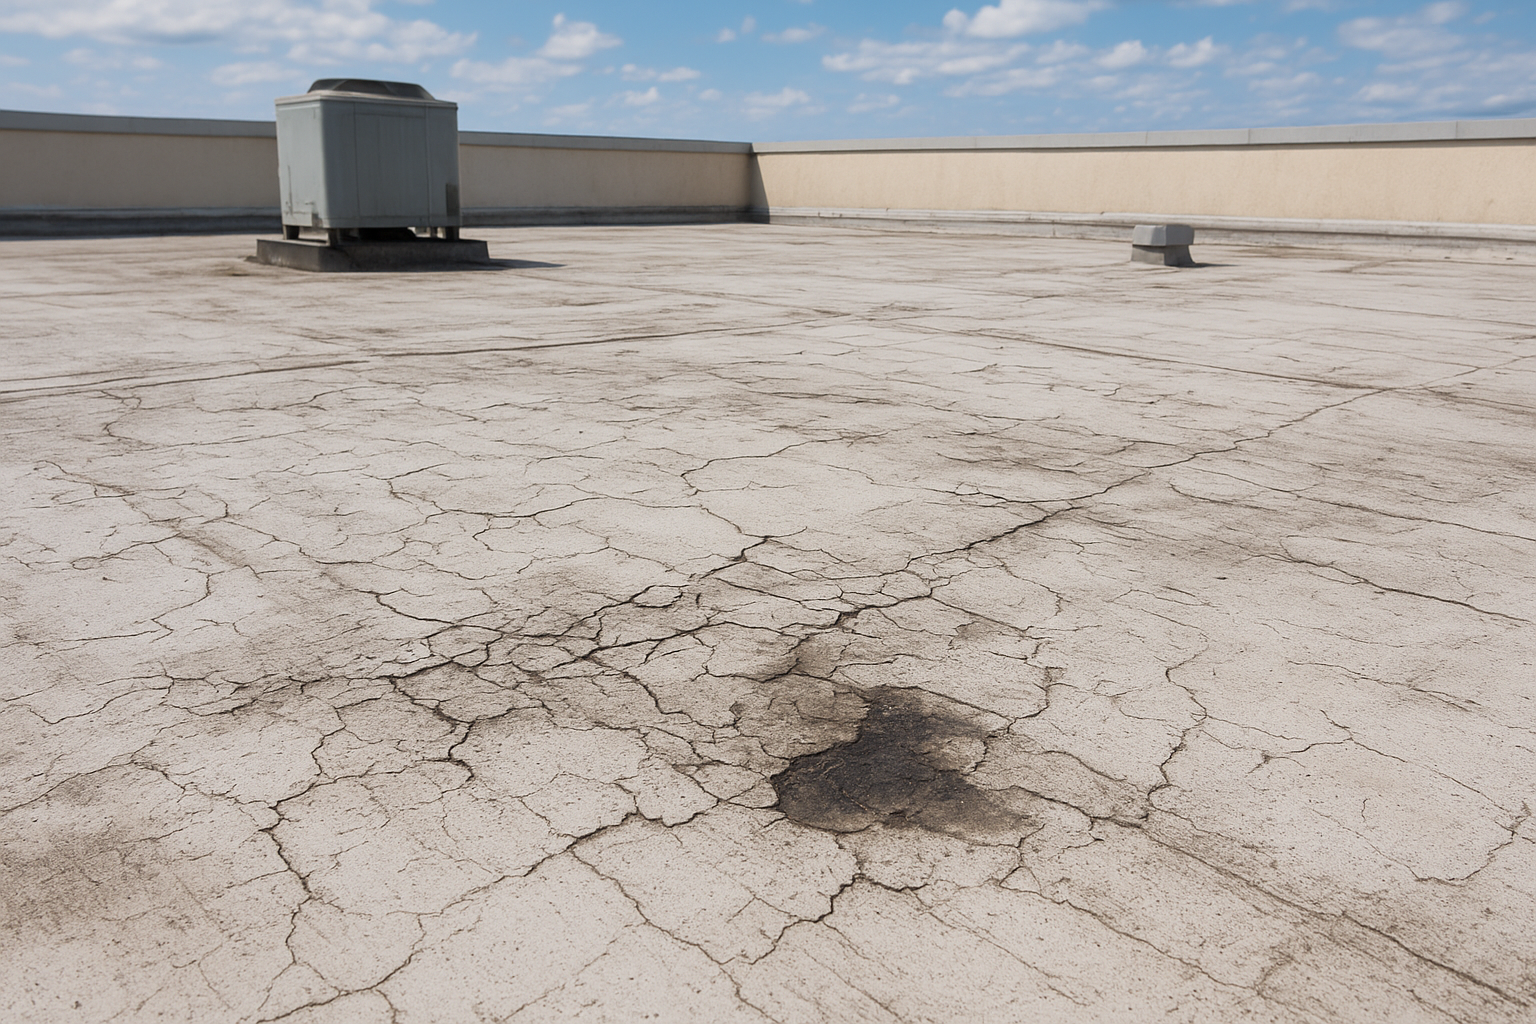
Why this area matters
The membrane condition directly affects your roof’s waterproofing capability and remaining lifespan. Small surface defects allow water penetration that damages insulation, decking, and interior ceilings. Catching membrane deterioration early saves you from structural repairs that cost 10 times more than simple patch work.
A compromised membrane turns minor maintenance into major reconstruction within 18 to 24 months.
What to look for
Inspect for cracks, blisters, punctures, and UV degradation across the entire membrane surface. Look for discoloration, shrinkage, and areas where the membrane has pulled away from attachment points. Check for granule loss on modified bitumen roofs and chalking on single-ply membranes that indicates chemical breakdown.
How to check it
Walk the entire roof surface in a grid pattern to ensure complete coverage. Press lightly on suspicious areas to detect soft spots or hidden moisture. Use a moisture meter to confirm water infiltration beneath apparently intact surfaces if you notice discoloration or unusual wear patterns.
Red flags that need a pro
Contact professional roofers when you find widespread cracking, multiple active leaks, or extensive blistering. Large punctures, significant membrane shrinkage, and exposed insulation all require immediate expert assessment and repair.
How to document findings
Photograph all damaged areas with reference points like rooftop equipment or building corners for precise location mapping. Measure and record the size of defects, noting whether damage appears isolated or part of a broader deterioration pattern across your roof.
3. Flashing, seams, and transitions
Flashing and seams create the critical junctions where different roof sections meet, and these connection points fail more often than any other part of your commercial roofing system. Your commercial roof inspection checklist should prioritize these areas because 90% of commercial roof leaks originate at transitions and seams rather than the main membrane field.
Why this area matters
Flashing protects vulnerable areas where your roof meets walls, curbs, and elevation changes. These metal or membrane strips prevent water from entering gaps at penetrations and edges. Seams join individual membrane sheets together, creating potential weak points where thermal expansion and contraction cause stress.
Properly sealed transitions prevent water from following the path of least resistance into your building envelope.
What to look for
Inspect all flashing for rust, loose fasteners, and separated caulk joints around base plates and counter-flashings. Check seam integrity for delamination, open laps, and missing adhesive along membrane joints. Look for stress cracking at expansion joints and areas where roof planes change direction.
What to look for
Examine metal flashing for corrosion, bent sections, and missing sealant at termination bars. Test membrane seams by gently pulling to identify weak bonds or incomplete heat welds. Search for gaps where caulk has dried out and pulled away from surfaces.
How to check it
Run your hand along seams to feel for raised edges or separation points that aren’t visually obvious. Use a blunt tool to probe caulked joints and test whether sealant remains flexible or has become brittle. Inspect flashing from multiple angles to catch shadows that reveal gaps or lifted edges.
Red flags that need a pro
Call professional roofers when you discover widespread seam failures, rusted-through flashing, or water staining beneath transition areas. Multiple separated seams or completely detached counter-flashing require immediate expert repair to prevent structural water damage.
How to document findings
Photograph each compromised transition with close-up and wide-angle shots showing location context. Note the flashing material type and measure gap widths or separation lengths for accurate repair estimates.
4. Penetrations and rooftop equipment
Rooftop penetrations create the highest-risk points for water intrusion on any commercial building. This critical section of your commercial roof inspection checklist addresses HVAC units, vent pipes, exhaust fans, skylights, and electrical conduits that puncture your roof membrane. Each penetration requires specialized flashing and sealing to maintain your roof’s waterproof integrity.
Why this area matters
Penetrations break the continuous membrane barrier and create opportunities for water to track underneath your roofing system. Equipment vibration loosens fasteners over time, while thermal cycling causes sealants to crack and separate from metal surfaces. These failure points account for more leak calls than any other roof component.
Every rooftop penetration represents a potential leak path that requires consistent monitoring and maintenance.
What to look for
Check all penetration boots and gaskets for cracks, tears, and hardened rubber that no longer seals tightly. Inspect equipment curbs for rust, loose anchor bolts, and deteriorated sealant around base flashing. Look for gaps between pipes and their collars, standing water around equipment pads, and damaged electrical conduit seals.
How to check it
Walk around each piece of rooftop equipment to examine all four sides of curb flashing and pitch pans. Test rubber boots by pressing gently to verify they remain flexible and properly sealed to penetrating pipes. Check that equipment sits level and doesn’t wobble when pushed, which indicates loose mounting.
Red flags that need a pro
Contact professional roofers when you find multiple failed penetration seals, corroded equipment curbs, or active leaks around HVAC units. Tilted or unsecured equipment, cracked pitch pans, and completely deteriorated pipe boots require immediate expert attention.
How to document findings
Photograph each compromised penetration with equipment identification numbers or location markers visible in the frame. Record the penetration type, size, and specific seal failure points for accurate repair specifications.
5. Drainage, ponding, and water management
Proper drainage protects your commercial roof from premature failure and structural damage caused by standing water. This essential component of your commercial roof inspection checklist examines how effectively your roof sheds water and prevents pooling in low-lying areas. Most commercial roofs include built-in slopes, but debris accumulation and structural settling create drainage problems over time.
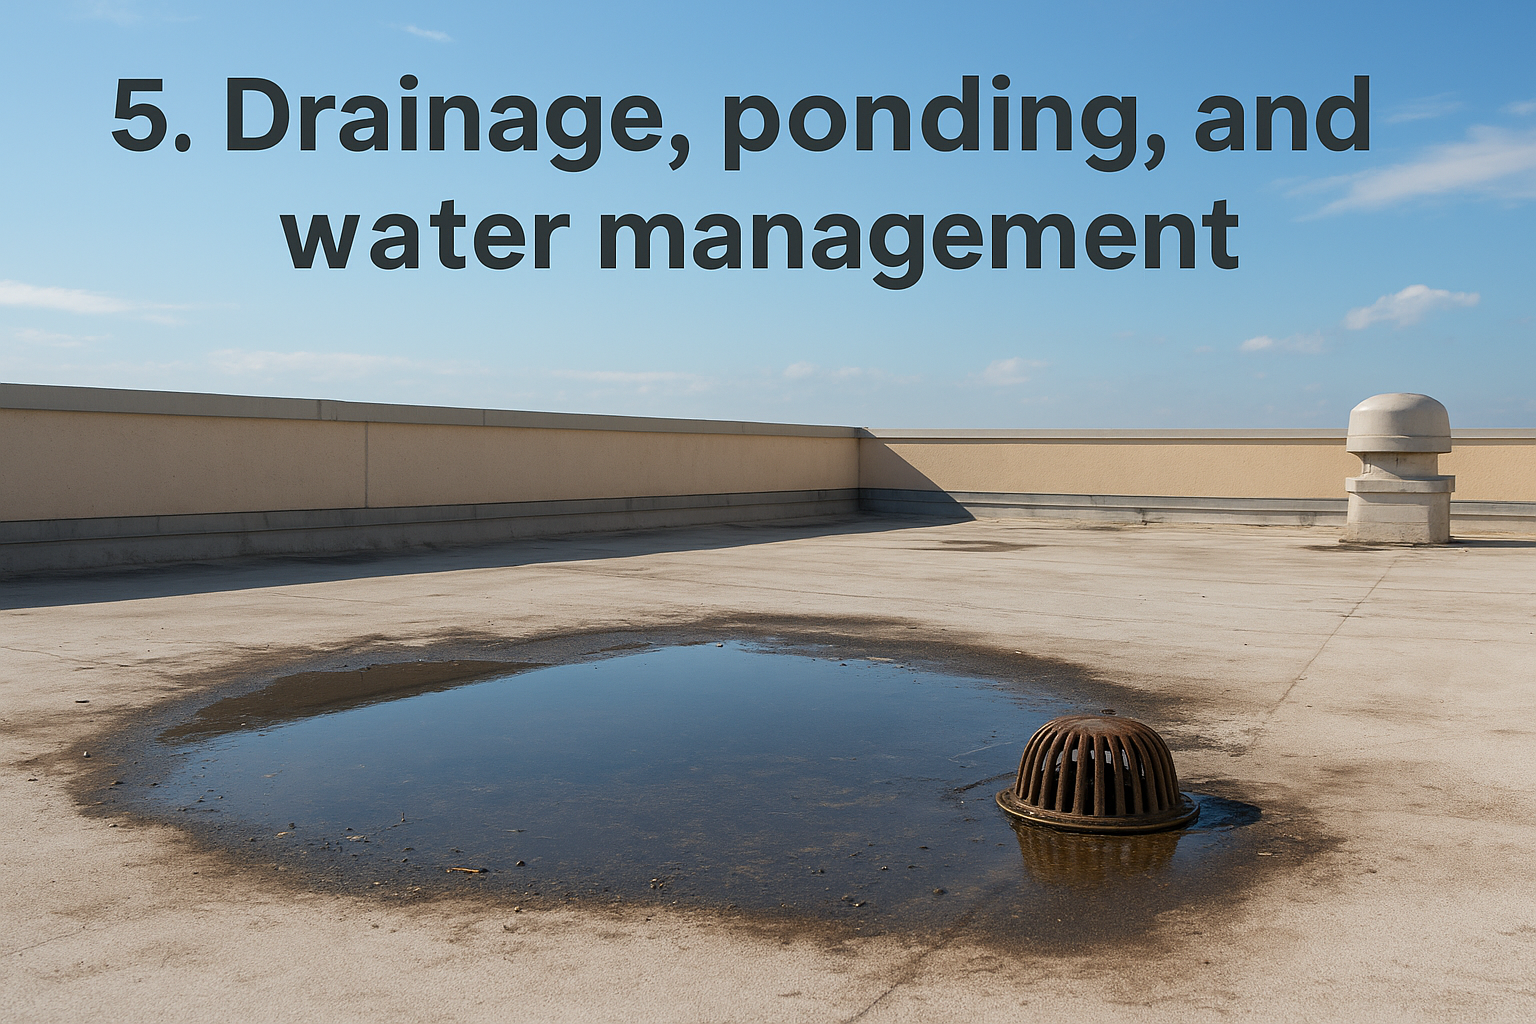
Why this area matters
Standing water accelerates membrane deterioration and adds significant weight load to your roof structure. Ponding that persists longer than 48 hours after rainfall degrades UV-protective coatings and creates breeding grounds for algae and vegetation that further compromise your roofing system. Blocked drains force water toward vulnerable seams and penetrations, multiplying your leak risk.
Water weighs approximately 62 pounds per cubic foot, and just one inch of ponding across a 1,000-square-foot area adds over 5,000 pounds to your roof structure.
What to look for
Check for water stains, algae growth, and visible pooling in roof depressions 48 hours after rain events. Inspect all drains, scuppers, and gutters for debris blockages, rust, and damaged strainer domes. Look for sagging areas, settlement cracks, and vegetation growth that indicates chronic moisture problems.
How to check it
Visit your roof immediately after rainfall to identify active drainage patterns and ponding locations. Use a straight edge or level to measure depression depths and confirm proper slope toward drainage points. Clear visible debris from drains and observe whether water flows freely.
Red flags that need a pro
Call professional roofers when you discover structural sagging, completely clogged drain systems, or ponding deeper than two inches. Multiple blocked drains and widespread algae growth require expert assessment and system redesign.
How to document findings
Photograph ponding areas with measurement references showing water depth and affected square footage. Record drain conditions and note how long water remains after rain events for accurate problem assessment.
6. Perimeter edges, parapets, and wall terminations
The outer boundaries of your commercial roof experience the most intense weather exposure and mechanical stress from wind uplift forces. This final section of your commercial roof inspection checklist examines coping caps, edge metal, gravel stops, and parapet wall flashings that protect your building from wind-driven rain and structural damage. Perimeter failures allow water behind your roofing system where it causes hidden deterioration.
Why this area matters
Edge systems resist wind forces that can peel back your entire roof membrane during severe storms. Parapets and wall terminations create vertical surfaces where water tracks downward and finds entry points through compromised flashing. Failed perimeter components void manufacturer warranties and create liability risks from falling debris during high winds.
Wind speeds increase exponentially at roof edges, making perimeter components the first line of defense against catastrophic blowoff.
What to look for
Inspect coping caps for loose fasteners, open joints, and separation from parapet walls. Check edge metal for rust, bent sections, and missing screws along fascia attachments. Look for cracked wall flashing, separated termination bars, and exposed membrane edges at vertical surfaces.
How to check it
Walk the entire roof perimeter and test coping stability by applying light pressure to detect movement. Examine parapet walls from both roof and ground level to identify staining patterns that indicate water penetration. Check that edge metal sits flush against roof substrates without gaps.
Red flags that need a pro
Contact professional roofers when you find multiple loose coping sections, severely corroded edge metal, or completely detached wall flashings. Widespread rust, visible membrane pullback, and parapet cracks require immediate expert evaluation and repair.
How to document findings
Photograph compromised perimeter sections with directional markers showing which building side displays damage. Measure gaps, note material conditions, and record wind damage patterns for insurance documentation.
What to do after your inspection
Your completed commercial roof inspection checklist gives you documented evidence of your roof’s current condition and a roadmap for necessary repairs. Organize your findings by priority level, addressing immediate leaks and safety hazards before tackling minor cosmetic issues. Share your documentation with your insurance provider if you discovered storm damage, and keep records for warranty claims or future reference.
Schedule professional repairs within 30 days for any red flag issues you identified during your walkthrough. Proactive maintenance prevents small problems from becoming structural emergencies that shut down operations. Create a recurring inspection schedule based on your roof type, with quarterly checks for older systems and semi-annual reviews for newer installations.
Commercial roofing requires expertise that goes beyond visual inspections. If your checklist revealed multiple problem areas or you need help interpreting your findings, contact Sunflowers Energy LLC for a professional assessment and comprehensive repair plan that protects your investment.

5 Responses