Master the Solar Panel Cleaning Process for Maximum Efficiency
Solar panels in dense city environments face unique challenges that impact their performance and lifespan. Dust, pollen, and urban debris quickly accumulate and block sunlight, causing efficiency to drop and energy bills to climb. Urban homeowners striving to cut costs and harness maximum power benefit from using safe, precise cleaning methods and proper safety equipment. This guide provides practical steps to tackle panel cleaning without risking damage or personal safety, so you can keep your system running at its best.
Table of Contents
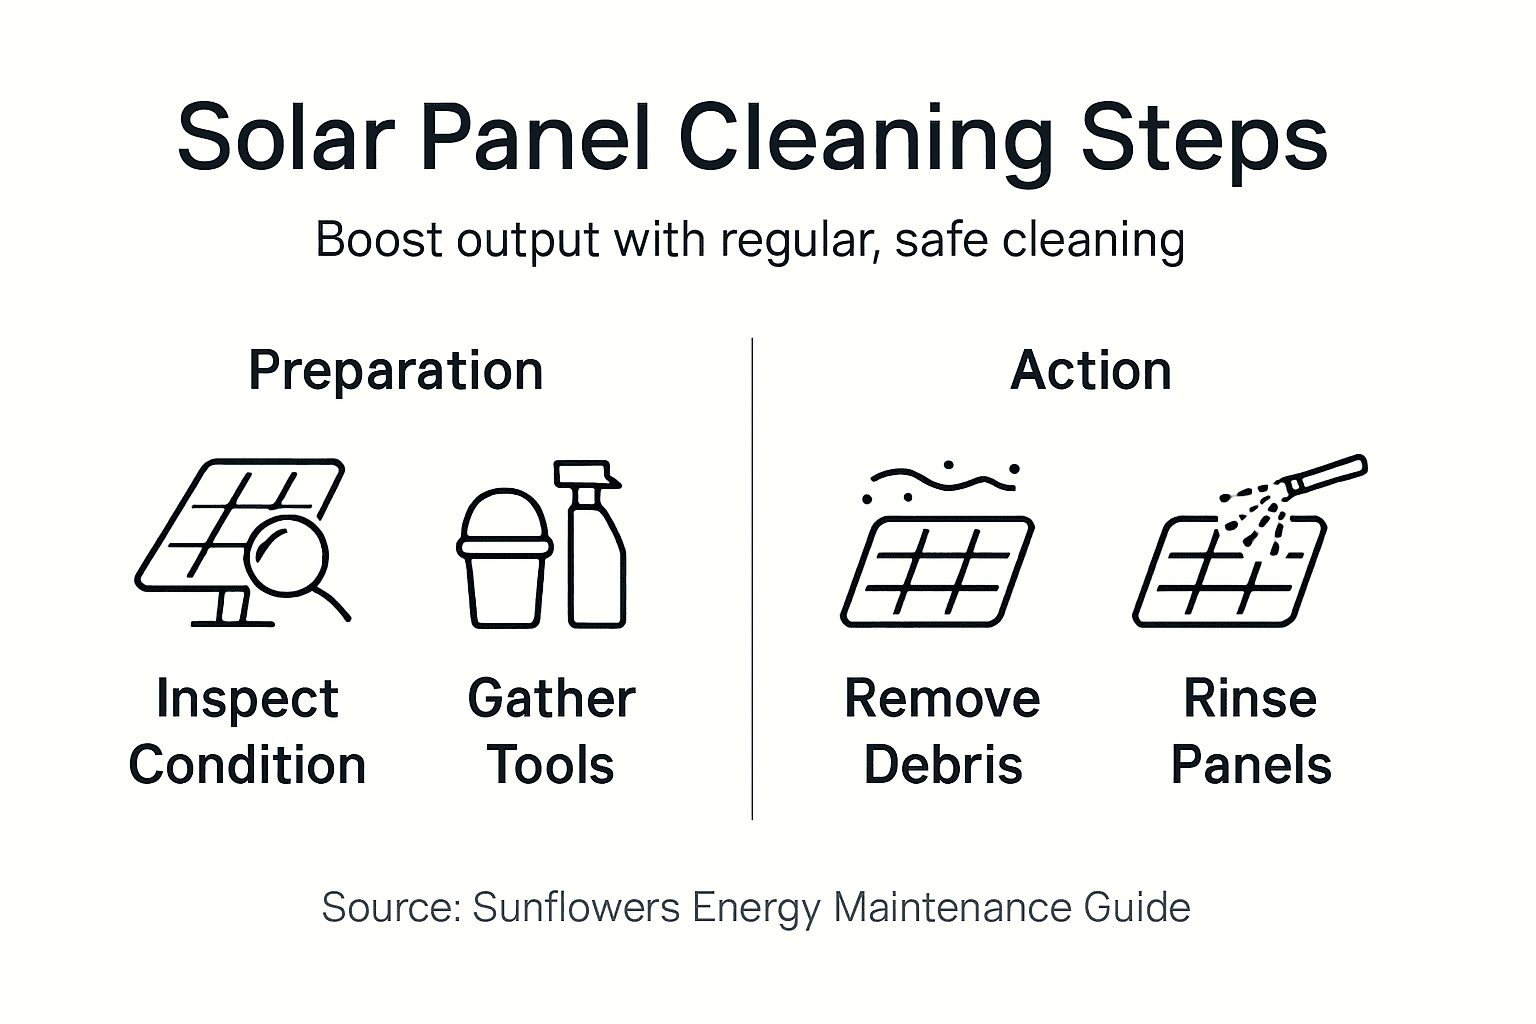
- Step 1: Assess Panel Condition And Site Safety
- Step 2: Gather Cleaning Tools And Materials
- Step 3: Remove Debris And Surface Dirt
- Step 4: Clean Panels With Proper Solutions
- Step 5: Verify Panel Cleanliness And System Output
Quick Summary
| Main Insight | Clarification |
|---|---|
| 1. Inspect Panels for Damage | Check for cracks, discoloration, and debris before cleaning to ensure safety. |
| 2. Use Proper Cleaning Tools | Select non-abrasive brushes and deionized water to avoid damage during cleaning. |
| 3. Follow Safe Weather Practices | Clean when the weather is clear and avoid cleaning under direct sunlight or during storms. |
| 4. Check Cleaning Results | After cleaning, ensure panels are spotless and verify output for operational efficiency. |
| 5. Document Panel Conditions | Take dated photos of panel condition pre-cleaning for future performance tracking and warranty purposes. |
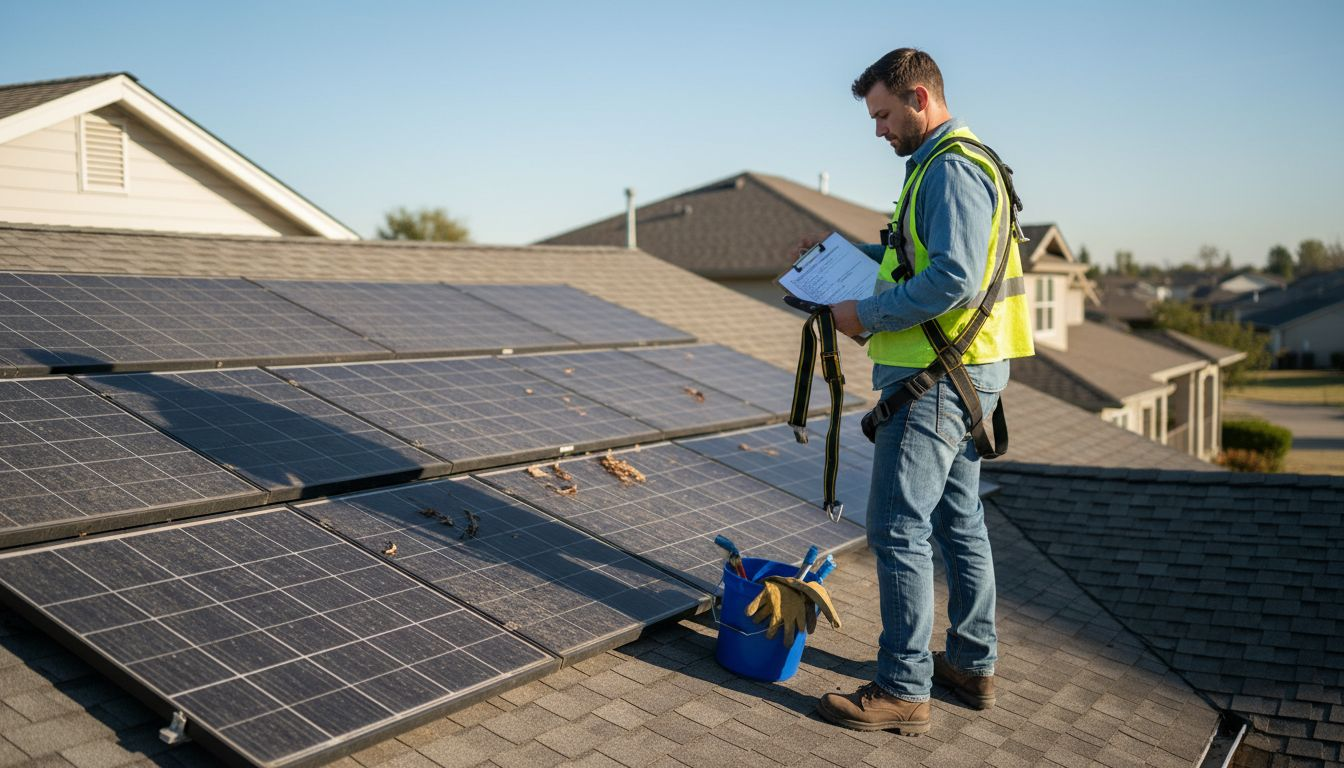
Step 1: Assess Panel Condition and Site Safety
Before you touch your solar panels, you need to understand what you’re working with and whether it’s safe to proceed. This step protects you, your home, and your investment by identifying hazards and panel damage before cleaning begins.
Start by inspecting your panels visually from the ground. Look for obvious signs of damage like cracks, discoloration, or debris buildup that might indicate underlying issues. Check the roof structure and mounting system to ensure they’re stable and secure. If you notice anything unusual, take photos and contact a professional.
Next, assess the electrical hazards around your system. Solar panels generate power even on cloudy days, which creates serious risks. Look for frayed wires, loose connectors, or exposed electrical components. If you spot any of these issues, stop immediately and contact your solar provider before attempting any cleaning work.
Evaluate your site conditions carefully:
- Weather conditions: Avoid cleaning during rain, high winds, or storms
- Time of day: Early morning or late evening is safer than peak sun hours
- Roof accessibility: Check that you have safe access and clear work areas
- Ground stability: Ensure ladders or scaffolding will have a firm, level surface
Solar panels are active power generators, not passive surfaces. Always treat them with the electrical safety protocols they demand.
Check that you have proper safety equipment for panel cleaning before moving forward. You’ll need non-slip footwear, a safety harness if working at heights, and insulated gloves if you’ll be near electrical components. Your roof condition matters too. If shingles are loose, cracked, or weak, cleaning is more dangerous and should wait for repairs.
Here is a quick-reference summary of safety precautions and potential hazards before cleaning solar panels:
| Safety Area | What to Look For | Why It Matters |
|---|---|---|
| Roof Stability | Secure mounting, no loose shingles | Prevent falls, structural risks |
| Electrical Hazards | Frayed wires, exposed connectors | Avoid shock or short circuits |
| Weather Conditions | No rain, storms, or high winds | Ensures safe working environment |
| Accessibility | Stable ladders, clear workspaces | Reduces accident risk |
| Personal Safety Gear | Harness, gloves, non-slip footwear | Protects from slips or injury |
Pro tip: Document your panel condition with dated photos before cleaning so you can track any changes in performance and have evidence of their pre-cleaning state for warranty purposes.
Step 2: Gather Cleaning Tools and Materials
You need the right equipment before starting. Using incorrect tools can scratch your panels and reduce their efficiency, so choosing carefully matters more than you might think.
Water is your foundation. Use pure or deionized water rather than tap water, which contains minerals that leave streaks and spots on your panels. A standard garden hose works, but a water sprayer system gives you better control and reduces waste. For hard-to-reach areas, a telescopic water brush extends your reach safely without requiring you to climb higher.
For actual cleaning, soft materials are non-negotiable. Grab microfiber cloths and soft-bristle brushes that won’t scratch the glass surface. Avoid anything abrasive like steel wool or stiff bristles. If your panels have tough buildup, a soft-bristle motorized brush can handle stubborn residues without damaging the surface.
You may want a mild detergent, but check your panel manufacturer’s recommendations first. Many specify particular cleaning solutions or recommend avoiding soap altogether. When in doubt, pure water does the job.
Gather your safety gear before you start:
- Stable ladder or scaffolding with secure footing
- Safety harness if working at heights
- Non-slip footwear for traction on wet surfaces
- Work gloves to protect your hands
- Eye protection from splashing water
The difference between amateur and professional panel cleaning often comes down to equipment quality. Cheap brushes save money upfront but risk expensive panel damage.
Organize everything in one spot so you’re not scrambling mid-cleaning. Having your materials ready before you climb prevents unnecessary trips and keeps you focused on the task.
Pro tip: Invest in a quality microfiber cloth set and keep backups on hand, as these wear out faster than brushes but are essential for streak-free drying and finishing touches.
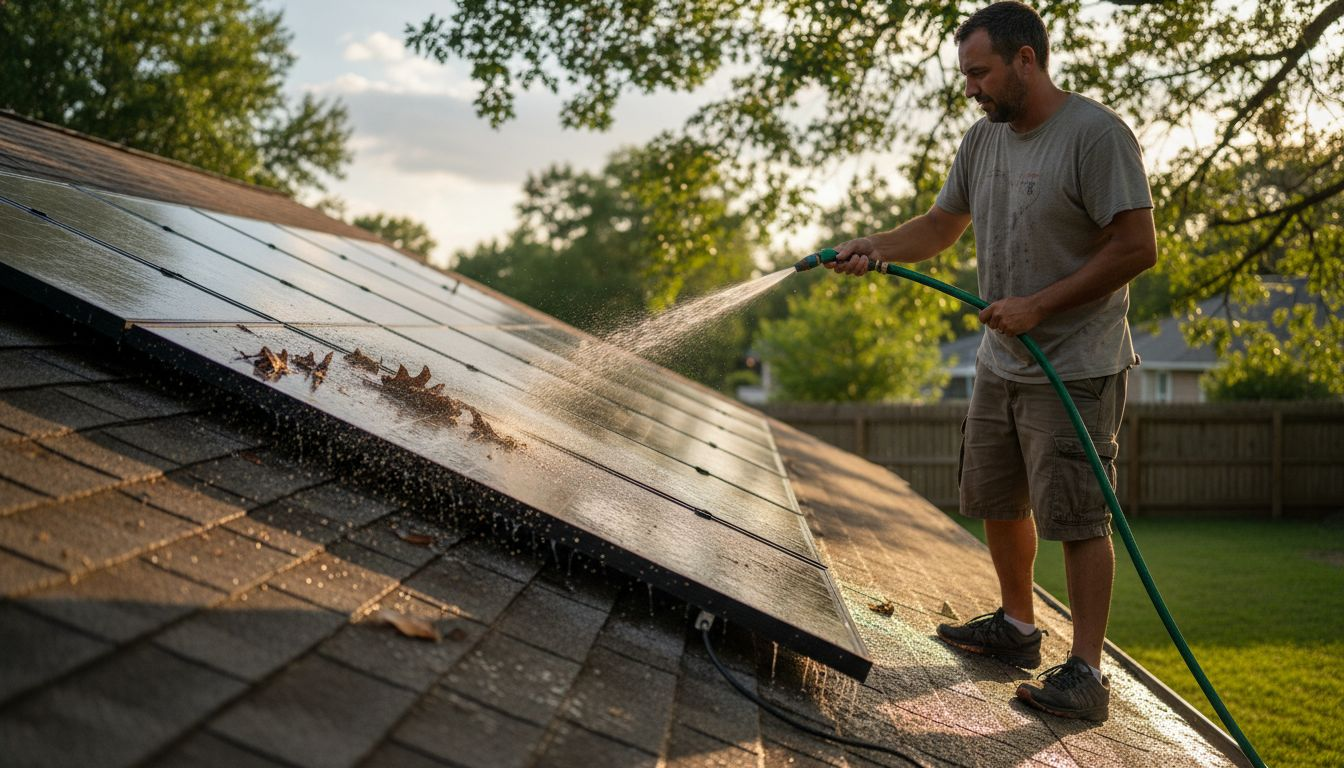
Step 3: Remove Debris and Surface Dirt
This is where the actual cleaning begins. Your goal is to clear loose dust, leaves, bird droppings, and other surface contaminants that block sunlight from reaching your panels.
Start with a dry rinse using your water sprayer or garden hose. This initial flush removes the bulk of loose debris without you having to scrub. Direct water across the panels at a gentle angle rather than directly overhead, which helps push dirt away without forcing water into crevices.
Once you’ve cleared the loose material, assess what remains. Light dust and pollen may wash away with water alone. For stubborn grime or buildup, that’s when your soft-bristle brush or microfiber cloth comes into play. Apply gentle pressure while scrubbing with circular motions to avoid streaking or damaging the glass.
If water alone isn’t cutting through the dirt, prepare a mild soap solution. Dilute your manufacturer-approved cleaner in a bucket of deionized water and apply it with your brush or cloth. Work in small sections so the solution doesn’t dry on the panel surface, which creates spots.
Use this comparison table to choose the right cleaning method for your panel condition:
| Cleaning Method | Best For | Risk Level |
|---|---|---|
| Pure Water Rinse | Light dust, pollen | Very Low |
| Soft Brush + Water | Moderate debris | Low |
| Mild Detergent Solution | Stubborn buildup | Moderate |
| Abrasive Tools/Cleaners | Never recommended | Very High |
Here’s your approach for stubborn debris:
- Start gently with water and soft brushing before escalating to soap
- Work systematically across panels in sections rather than randomly
- Rinse immediately after scrubbing to prevent soap residue
- Avoid harsh chemicals or abrasive materials that scratch glass
- Pay attention to edges where dirt accumulates more heavily
The key to avoiding panel damage is patience. Let water do most of the work before applying physical pressure with brushes.
Rinse thoroughly when you’re done scrubbing. Any soap or cleaning solution left behind attracts dirt and reduces light transmission. A final gentle spray ensures your panels are completely clean and ready for the next step.
Pro tip: Clean your panels early morning or late evening when they’re cool to the touch, as cleaning hot panels can cause water to evaporate too quickly, leaving behind mineral deposits and streaks.
Step 4: Clean Panels with Proper Solutions
Now that you’ve removed the loose debris, it’s time to tackle any stubborn residue. The solution you use makes a real difference in both cleaning effectiveness and panel longevity.
Start with the simplest approach. Fresh water alone removes most dust and light soiling without any chemicals. For many urban homeowners, a gentle rinse with deionized water is all you need. This avoids introducing any substances that could leave residue or streaks on your panels.
When water alone doesn’t cut through the grime, introduce a cleaning solution. Use non-abrasive detergents specifically formulated for solar panels rather than household cleaners. These gentle formulas dissolve hardened bird droppings, pollen buildup, and oily substances without damaging the glass coating.
For non-abrasive solar panel cleaning solutions, mix your chosen cleaner with deionized water according to manufacturer instructions. Apply it with your soft-bristle brush and work in small sections. Let the solution sit for a minute or two so it can break down stubborn residues, but don’t let it dry on the surface.
Your solution application process should follow these steps:
- Mix your cleaner according to manufacturer guidelines in a bucket
- Apply to one panel section at a time with your brush
- Let it sit briefly for the solution to work on tough buildup
- Scrub gently with circular motions to avoid streaking
- Rinse immediately with clean water to remove all soap residue
Never use harsh chemicals, vinegar, abrasive scrubbers, or general-purpose household cleaners on your panels. These damage the protective coating and reduce efficiency.
Timing matters more than you might realize. Clean your panels early morning or late afternoon when they’re cool. Hot panels cause water to evaporate too quickly, leaving mineral deposits behind.
Rinse each section thoroughly before moving to the next. Any leftover cleaning solution attracts dirt and defeats your purpose. Your panels should look crystal clear when you’re done, with no streaks or soap film.
Pro tip: Test any new cleaning solution on a less visible corner of a panel first to ensure it doesn’t cause spotting or residue before committing to your entire system.
Step 5: Verify Panel Cleanliness and System Output
Cleaning is only half the battle. You need to confirm your panels are actually clean and that your system is performing as expected. This verification step ensures your effort paid off and helps catch any underlying issues.
Start with a visual inspection from the ground. Your panels should look spotless with no visible streaks, spots, or residue. Walk around your home and check each section carefully. If you see any remaining dirt, bird droppings, or mineral deposits, those spots need another round of cleaning.
Pay special attention to panel edges and corners where water tends to pool and leave deposits. These areas are easy to miss but significantly impact overall system performance. Sunlight hitting clean glass means more electricity generated.
Now check your system’s output. Most modern solar installations have a monitoring app or display that shows real-time power generation. Compare your output before and after cleaning to see the improvement. On a clear day with similar sun angles, you should notice increased production if your panels were genuinely dirty.
Here’s what to track for verification:
- Visual clarity of all panel surfaces from multiple angles
- Real-time power output through your monitoring system
- Historical data comparing today to previous sunny days
- Absence of streaks or water spots on the glass
- No debris or buildup in panel edges or mounting brackets
A clean solar panel system can produce 10 to 25 percent more electricity than a dirty one, depending on soiling severity. That’s a real, measurable difference in your energy savings.
If output hasn’t improved despite visible cleanliness, there might be deeper issues. Microcracked panels or faulty connections don’t show up visually but reduce efficiency. Document your findings with photos and notes for future reference.
Regular solar panel maintenance and monitoring helps you track performance trends over time. This data becomes valuable for identifying when your next cleaning is needed and whether professional inspection is warranted.
Pro tip: Take photos of clean panels in good lighting conditions and note the power output on your monitoring app so you have a baseline for comparison when deciding if future cleaning is necessary.
Elevate Your Solar Panel Cleaning for Lasting Efficiency and Energy Savings
Cleaning your solar panels properly is essential for maximizing their performance and protecting your investment. The article highlights challenges like avoiding electrical hazards, selecting the right cleaning tools, and verifying system output after cleaning. These specific pain points show how critical professional-quality maintenance and careful attention are to prevent damage and ensure your panels deliver peak energy savings.
At Sunflowers Energy, we understand that maintaining clean, efficient solar systems requires expert knowledge and reliable support. Our comprehensive solar energy solutions blend premium installations with ongoing care, helping you avoid risks like roof damage or inefficient panel performance caused by improper cleaning. Whether you want to upgrade your residential or commercial solar setup or need guidance on maintaining your system safely, we provide advanced technology and trusted service tailored to your needs.
Discover how partnering with a trusted expert can take the worry out of solar panel upkeep. Request a free onsite inspection and personalized quote today to keep your solar panels spotless and producing at their best. Learn more about our sustainable solar services on the Sunflowers Energy website and explore how our roofing repair and storm damage restoration services protect your home and investment through every season. Make the smart choice for long-term energy efficiency and home protection now.
Frequently Asked Questions
How often should I clean my solar panels for maximum efficiency?
Cleaning your solar panels at least twice a year is recommended for maximum efficiency. For best results, consider cleaning more frequently if you live in a dusty area or have many trees that drop debris on your panels. This routine will help maintain optimal power output throughout the year.
What tools do I need to clean my solar panels safely?
You will need a few essential tools including a garden hose, a soft-bristle brush, and pure or deionized water. Make sure to also have safety gear like non-slip footwear and a safety harness if you are working at heights. Gathering these tools ensures you can clean effectively and safely.
What safety precautions should I take before cleaning solar panels?
Before cleaning, inspect your roof and the solar panels for any damage or electrical hazards, such as frayed wires. Ensure you have stable access points and are working in safe weather conditions, like avoiding rain or strong winds. Taking these precautions minimizes the risk of accidents.
How do I know if my solar panels are clean after washing?
After cleaning, visually inspect the panels from various angles to ensure there are no streaks or buildup. You can also check your system’s output through its monitoring app—an increase in power generation indicates successful cleaning. Aim for clear visibility without any remaining spots.
Can I use regular soap to clean my solar panels?
It is best to use only non-abrasive cleaning solutions specifically formulated for solar panels. Regular household soaps can leave residue or damage the panels. When in doubt, using pure water is often the safest cleaning method.
What is the best time of day to clean solar panels?
Cleaning solar panels early in the morning or late in the evening is ideal when the panels are cooler. This helps prevent water from evaporating too quickly and leaving streaks. Timing your cleaning can significantly improve the results and efficiency.
Recommended
- Solar Panel Maintenance: Maximizing Efficiency and Savings – Sunflowers Energy LLC A Roofing and Solar Companys
- Solar Panel Efficiency Explained: Maximize Energy Savings – Sunflowers Energy LLC A Roofing and Solar Companys
- Solar Energy Efficiency Guide for Maximized Home Savings – Sunflowers Energy LLC A Roofing and Solar Companys
- Master the Solar Energy Savings Workflow for Your Home – Sunflowers Energy LLC A Roofing and Solar Companys
